-The type is printed and graphic interpretation.They got a lot example such as leaflets, publications, trail guides, indoor and outdoor panels and exhibitions.But today I want share with you about bunting. - It is classify as Printed And Graphic Interpretation. -graphical or represented by a graphor relating to the written or printed word or the symbols or devices used in writing or printing to represent sound or convey meaning. 2. Bunting objectives
-Our bunting is represent travel agency operation.Our purpose is to introduce that subject and incourage more student interesting to learn about it.
- Other than that, it can give information to people about what is travel agency activity is for those who don't know anything about travel agency.
3. Element in designing bunting ?
3. ELEMENT IN DESIGNING BUNTING
Pictures
-- I have used some pictures to make the information are clear to people.
- Pictures are one of 3 second attraction. It means that when people see it the first 3 second that they see is the pictures
-We use vector and png format for icon.
Background
- The background we took a view of jetty and river.
Font
-As for the font, i used font meme to generated a font.
-The font I have used in bunting is caladea font Text Generator.
EDITOR
- I use Microsoft Publisher is used to design bunting.
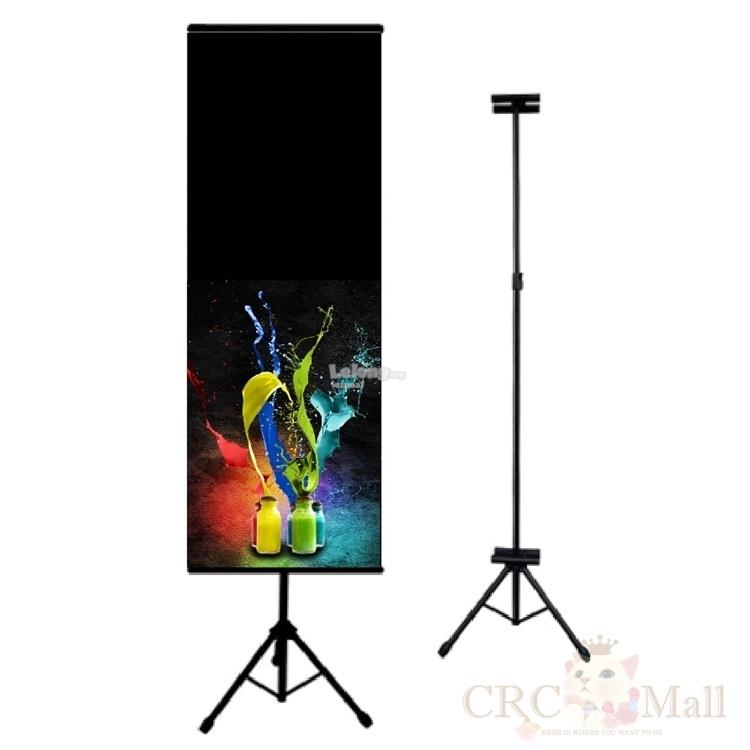
4. BUNTING TOOLS ANATOMY
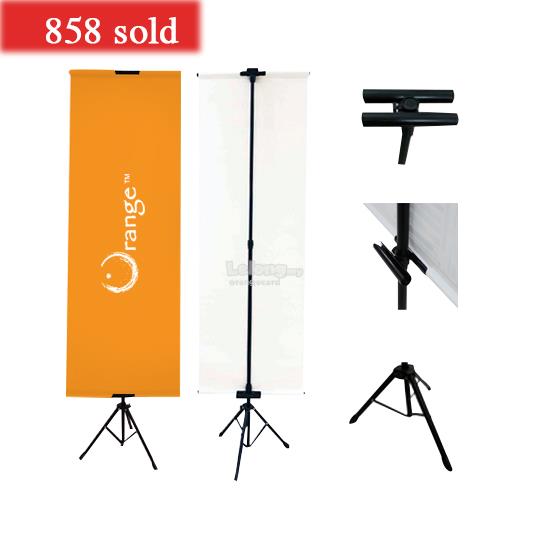
Bunting stand
- Bunting stand is to display the bunting in stand way.
-It have different material, weight and graphic size.
X Stand Bunting
-- These highly effective X-Banner Stands, also known as Spider Stands is one of the more affordable and flexible ways to display your banners
-- Adjustable to fit (2’x5’), (2’x6') sized banners, their extreme portability allow these X Frame Standsworks perfectly fine for presentations at trade shows and product conventions.
Jumbo Stand
-- The Banner Stand is a super, lightweight, non – retractable display,ideal for campaigns and product launches
-- This is portable and functional displaying equipment. Its simple structure makes it more popular in market, exhibition, company, job show for advertising. Everyone can set up it without instruction.
2.Select the images you want to edit, then tap Import at the bottom of the screen
3. Tap the photo you want to edit. A colored border will appear around the selected image.
4.To apply a VSCO filter to your photo, tap a filter of your choice from the bottom of the screen.
5.If the filter effect looks too strong, you can tone it down by reducing the filter strength.To access the filter strength slider, tap the black filter icon that you’ve just applied.
6.The final step is to save your edited image. Tap Save at the top of the screen.Tap Save To Camera Roll, then select Actual Size to ensure the image saves at full resolution.
7.Download More VSCO Filters .Having access to the full range of VSCO filters gives you far more choice over the style of your VSCO edits.
Interpretive talk is creating opportunities for the audience to form their own intellectual and emotional connections with meanings or significance inherent in the resource.
2. Explain the examples of interpretive talk and presentation techniques
Interpretive Talk
a) Promoting product
Promoting product by face to face interaction with customer is one of interpretive talk that needs training and skill in communication to enhance our selling.
Presentation Techniques
b) Visual style
speaking style, you might need to work a little harder to get your audience engaged, but the dividends can be huge for strong public speakers, visionaries, and storytellers.
3. Give an example of interpretive presentation tools and how to apply interpretive presentation tools for different audience and resources.
Interpretive presentation tools
a) Prezi
Prezi lets track the presentation’s performance by displaying an analytics of the viewers including what attracted them the most. Using Prezi it is more suitable to engaged with a young audience because it is more attractive and the resources can more easy to understands.
b) Visme
Make visual stories using stunning presentations and infographics with Visme. For Visme the audience are more to present a product to a company. Visme lets presenter express thoughts in an interactive way and transform boring data into interesting stories.
c) Picktochart
Piktochart lets you create infographics, which are presentable as slideshows. It is use in a board meeting and more able to present a status of financial statement in an organization because it can show a graph in the presentation.
Create Dispersion. PicsArt Photo Editor comes with tons of awesome editing tools.
Add Effects and Filters. Effects are really awesome edits that can be applied to images just like filters.
Add Stickers.
Draw Lines.
Change Background With Cutout.
Add Photos To Create Overlays.
Create Masks.
Color With Curves Tool.
2. How to use lightingroom
1.Sign out the account. 2.Open lighting for editting 3.Choose the photo. 4.Edit mode in Lightroom CC on a mobile device provides a comprehensive set of tools for you to enhance your photos. Tap to open a photo from the library or from an album and choose Edit mode. 5.Crop and straighten photos to improve their composition. Tap Crop and choose a fixed aspect ratio from the menu, or drag the handles to use a custom ratio. You can also use the rotate dial to straighten your image. Tap the checkmark to accept the changes. 6.Use presets to apply a unique look or filter effect to your photos. Select Presets from the adjustment menu. Choose from one of the Preset categories — such as Creative, Color, or B&W — and then select a preset. Tap the checkmark to apply the preset. 7.It’s common to want to improve the light in a photo. Tap Light, and then adjust the Exposure and Contrast sliders to make your photos pop. Increase highlights and darken the shadows to create more contrast in the bright and dark parts of your image. 8.If the color in your photo doesn’t reflect the vividness of the original scene, tap Color and adjust the Temperature slider to create a warmer or cooler image. Use the Saturation slider to increase or decrease the intensity of the colors in your photo. Be careful not to oversaturate your image — the colors can easily become too intense. An alternative is to use the Vibrance slider, to focus on increasing the intensity of the more muted colors in your photo. 9.Photos contain a lot of details that are worth enhancing. Tap Effects, and then experiment with the Clarity slider to add (or remove) contrast to the midtones of your photo. Often this brings out detail in the textures of your image. The Vignette slider darkens or lightens the edges of your photo. Slide it to the left to darken the edges and put a subtle focus on the subject in the center of the photo. 10.Photo editing is an experimental process. To undo changes you’ve made to your image, tap the undo icon. Tap and hold to reveal the redo icon. To fully reset an image to its original state, tap Reset at the end of the adjustment menu. 11.All edits you make in Lightroom CC on a mobile device are reflected in Lightroom on your desktop and the web. Any changes you make in the desktop or web version are synced to mobile as well.
3. How to use adobe photoshop.
1.The Layer Tool
A layer can be used for an image, text, brush strokes, background colors, patterns, and filters.
2. The Color & Swatches Tool
The Color and Swatches tool lets you use, modify, copy, and save custom colors for your content. While this may seem like a pretty self-explanatory element, it actually has powerful features that will keep your visual content vibrant and unify your color schemes.
3.Custom Fonts & The Text Tool
The Text tool lets you add custom fonts to your database, and it gives you access to advanced font settings that give your text some serious style.
4.Custom Brushes & The Brush Tool
Just as with fonts, you can add your own, royalty-free, custom brush tips. With the brush settings, you can change the size, shape, and transparency of your brush strokes to achieve a number of different visual effects.
5.The Select Tool
When used correctly, this tool will let you select individual elements, entire graphics, and determines what is copied, cut, and pasted into your graphics.
6.The Move Tool
This is a fairly basic tool that allows you to move individual elements of your graphic.
7.The Zoom Tool
The Zoom tool lets you zoom in close to certain areas of an image, and zoom out to get more of a bird's eye view of what's happening.
8.The Eraser
The Basic Eraser functions a lot like the brush tool. You can change the size and hardness of the eraser tip to achieve a variety of effects, like blending and fades. The Background Eraser uses differences in color to help you erase unwanted background areas from your images.
9.The Crop Tool
The Crop tool lets you crop an image. It works like any crop tool you’ve ever encountered: Simply choose your area and crop it out.
10.The Fill Tool
The Fill tool, formerly the Paint Bucket tool, fills any solid area with the color of your choice. It's great for solid backgrounds or coloring large areas. It can also be used to apply patterns to your images. The Gradient tool within the Fill tool lets you create a nice, faded background effect of the color of your choice.
4. How to use photoscape
1.Open Photoscape and click on the Batch editor button. Once in the batch editor, navigate to the folder that you want to work with.
2.Click on the ADD button to go to the folder view closeup.
3.Make sure you are in the correct location.
4.Select the photosthat you want to process.
5.click on the files that you want to resize and watch them appear in the top, middle window. (Alternatively, you can drag the photos there). Experiment with what serves your purpose. You might want them a certain size for thumbnails, or for uploading somewhere.
Hai assalamualaikum. Hari ni saya nak ajar korang semua macam mana nak buat video yang macam saya buat ni. Video ni korang boleh guna juga masa nak buat resume untuk menampak kan video tu menarik. Kalau tak nak buat resume korang boleh buat video travel.
Ini cara saya yang diajar oleh pensyarah saya, Miss Akasyah. Jom kita mula!
Ok bila dah keluar macam yang dekat atas tu korang tekan jek yang gambar google tu. Sebab senang nanti dia akan terus connect dengan account google kita. Lepas dah masukkan account gmail. Korang dah boleh buat video korang. Tekan CREATE A NEW VIDEO .
Kemudian dia akan keluar macam ni. Korang boleh pilih dekat promote tu nak buat apa. Dekat situ ada banyak. Kemudian dah siap pilih korang tekan FIND A TEMPLATE. Lepas tu dia akan keluar template macam dekat bawah tu. Korang boleh pilih nak yang mana. Kemudian tekan EDIT THIS VIDEO.
Lepas dia akan keluar macam ni pula. Dekat sini korang semua boleh adjust apa yang korang nak. Contoh nak berapa duration semua tu. Lepas dah settle semua ni. Korang tekan PREVIEW.
Lepas tu dia akan keluar macam ni pula. Korang tekan je BUILD MY PREVIEW
Ok, lepas dah tekan tu dia akan prosess video korang dalam beberapa minit. Ni bergantung pada korang punya video tu ada berapa scene.Kalau banyak, maknanya lama la juga (boleh la g minum kopi dulu)hahaha
Ok, lepas dah siap video korang diprosess.Korang tekan PUBLISH THIS VIDEO
Lepas dah publish tu. Video korang pun dah siap. Tapi belum save lagi! kalau korang macam nak save video ni. Korang tekan jek dekat yang ada gambar YOUTUABE tu. Lepas tu masukkan account gmail korang macam biasa. Then dia akan terus connect kan dekat youtube. Lepas tu buka youtube, Tekan dekat YOUR CHANNEL.
Lepas dah siap tekan your channel, dia akan keluar video korang yang dah diupload tadi.Contoh macam saya punya ni.
Korang click video yang korang dah upload tadi.
Lepas tu dia akan keluar video korang tu. Korang gantikan WWW. tu dengan SS
Make sure sekali dengan titik www tu okay! (jangan lupa)
Nanti dia akan keluar macam ni. Tengok tu, ss ok.
Ok lepas dah gantikan www. tu dengan ss . Dia akan keluar macam ni pula. Korang tekan je DOWNLOAD. Kemudian dia akan automatik download video korang tu. Ok dah siap!
![Twinkle [Almeera Studio] Font Generator Preview](https://fontmeme.com/temporary/07dfcd267f3d62aeb956e5b39645458f.png)


